Showing posts with label Teacher Appreciation. Show all posts

Thursday, May 6, 2010

Teacher Appreciation~6

Ahhh...Teacher Appreciation Week is coming to a close! 

Here is the last little gift I whipped up last night.  Mrs. Duthie "wished" for colored plastic cothespins and stickers on her wishing tree this week....so I made this little board to present them to her.

I thought this board would be useful in class for those papers without names, or just for all of those important papers she needs to attend to.


Here is how I did it.  It is Very Simple!

1 piece of wood  (I had a scrap of wood from the garage.  It is 9 inches x 28 inches.)
1 package of plastic clothespins 
1 piece of paper
Vinyl name "Mrs. Duthie's Clipboard"  (or you could print it on paper and mod podge it on)
Ribbon
Mod podge and brush
Paint and brush
Sanding block 
Hot glue gun and glue

1. Gently sand the rough edges off of the wood. Then paint it (I just painted the front).
2.  Mod podge the paper onto the middle.  I put mine on slanted.
3.  Rub the edges with the sanding block for a little distressed look. 
4.  Put the vinyl name on at the top and hot glue the  4 clothespins on.
5.  Drill 2 small holes at the top and string ribbon through for hanging...You are done!

I clipped the extra clothespins onto the side and then put some sticker packs onto the clips.
After I was done I thought it needed some extra cuteness so I added these paper flower with a brad in the middle.  Just hot glue them onto the 4 clothespins that are glued to the board.
Now we can all take a breather and have Happy Teacher Appreciation until next year!!

Monday, May 3, 2010

Teacher appreciation~5

Teacher Jars and Etching
My friend Caroll had an etching craft party this month and it was really easy and fun.  Since then I have been a little obsessed...and I have been trying to think of something to make for our teachers with etched glass. 
D U T H I E
I used vinyl as the pattern.  I took  the letter out and used the vinyl that was left as the pattern. 
Then we dabbed the etching cream on to make the letters. 
I spray painted the lids white so they would all match. 
I added some ribbon around 3 jars and glued a flower to the top of one jar.
I filled them with breath mints, red pens and highlighters, candies, gel pens, #2 pencils, and paper clips.
It looks really neat (look close it is hard to see with the glare in the photos). 
You could just use the vinyl letters on the jars and that would be cute too!
Happy Teacher Appreciation Week!

Saturday, May 1, 2010

Teacher Appreciation~4

Here is a Teacher Appreciation Idea that I have been working on today.
This one is for the Staff Lounge for All to Enjoy. 
(the sayings for the treats came from my sister In law Jen...I want to give credit where credit is do, but I am not sure where she heard them.  Or she may have thought them up...she is creative like that {smile})
First, make a sign or poster to hang in the teachers lounge with a nice message.  I prefer to digiscrap so I am going to have mine printed at Costco for $2.99.  This is a 12x18 that I designed in photoshop using a freebie kit.  Go to Shabbyprincess.com to find it.  It is called Sweet Serenity. 
     Leave a space at the bottom for messages that can be switched every day.
We are going to hang it on the wall above a small table.  Then place upon the table, a nice bowl.
Every day fill the bowl with a treat and hang a new sign that corresponds to it (on the stripey blank area above).  Mine below are 5x7 and I will also have them printed at Costco.

Individually wrapped Sunflower Seeds (this one will be up the day the kids bring flowers!)

Dum-Dum Suckers and Smarties

Individually Wrapped Lifesavers


Hersheys Kisses and Hugs Chocolates (this one will be up on chocolate day!)


Carefree Gum


Check back soon for a teacher appreciation gift that uses those little glass jars that they dont recycle for us here in Boise!

Friday, April 30, 2010

Teacher Appreciation~3

Simple Denim Aprons
I already posted that I was going to make Simple Denim Aprons for our teachers this year. 
Here is how they turned out.  I love them!  I also added some chocolate in the pocket so T can take it on "Chocoriffic" Day (each day next week has a theme).

Check back soon for more ideas as I post what T will take for the other 4 themed days!

Thursday, April 29, 2010

Teacher Appreciation~2

Here are the things I did last year for Ms. Beck.  Let me know if you find some inspiration!

Name Poem Plaque
Ms. Beck made these acrostic name poems in class with our kids names and they were really neat. 
So I got the idea to make one out of her name and let my son pick the words (and write them).  I printed her name vertically onto scrapbook paper, mod podged it onto wood, tied a ribbon onto it, then mounted the wood onto white beadboard (I got the wood and beadboard from a house being built nearby!). 
Then I let T carefully write the words he chose to describe Ms. Beck.  
The easel is from IKEA.  I painted it white to match.


Spa Basket 
okay it is a stretch on the rhyme but it works...lotion, facial bars, bubble bath, body wash, chapstick 
(all bought with coupons for little or no cost!)
Then when I got to school that day to volunteer, I let each child in the class write something special about Ms. Beck on a die-cut flower, taped it to a straw, and poked it into her basket.


Movie Night
“Superman, Batman, pick one to see. You are a Super Hero to me!
I’m “Soda”lighted that you are my teacher!”
I just copied and pasted the Redbox logo and printed it onto white paper.  Then I glued it onto a homemade red envelope.  Add popcorn, movie candy,  some soda, and the cute tag line above and you are set.


Chocoriffic! Can
I know teachers probably get lots of candy so I filled this one with premium chocolates! 
The can is a formula can covered with scrapbook paper and tied with a chocolate-y brown ribbon. 
The tag is hooked on with the binder clip.


Covered Door~The Recipe for Success
I think decorating the classroom door is a super cute way to say Your GREAT!  I found the "Recipe for Success" theme out in blogland and then I went to the dollar store and got some things to go along with it. 
First I covered the door with some polka dot wrapping paper this made it so easy and cute!
I got 2 packages of plates to write names on, a set of oven pads, some cooking utensils, and an apron that all of her students could sign.  I wrote "Cooking up some Fun" on it.  I stuck the oven pads to the door with Scotch brand removable sticky hooks and they held great all week.  Then I die-cut apples and let the kids write the thing Ms. Beck had taught them that they loved the most. 


Cinco de Mayo
(I forgot to take a photo of this one last year and she took it home that night
and used it so I couldn't get a photo the next day!)
Cinco de Mayo always falls during Teacher Appreciation week so we might as well go with it, right ladies? 
Last year we did chips, salsa, and a taco kit.   This year I think I will do some cute margarita glasses and maybe a mix, nonalcoholic of course! 
Our tag read something like 
"Happy Cinco de Mayo! Have a Buena Fiesta, You are a Muey Buena Teacher!" 
...not sure if that is correct Spanish but she got it, I think!


Check back, I will post some things I am doing this year on Friday.

Wednesday, April 28, 2010

Teacher Appreciation~1

I thought I would spend the rest of the week posting fun ideas for teacher appreciation. 
Maybe it will inspire you to try something new this year, and that would be fun, right?

When my son was in first grade our school's PTA had the kids bring something every day for their teachers. Day 1 they all brought a flower and the teacher had a full bouquet, Day 2 they all brought a fruit and then the teacher had a big fruit basket, and so on.

On one of the days the kids were supposed to create a piece of art for the teacher. When I think art, I think photography. I let my son take the camera outside and go crazy taking photos of whatever he wanted. The best photo he got was a great close-up of a flower. So this little project was born...

Teacher Appreciation~1 Let Your Child Create A Masterpiece
I added a photoshop border, printed it on matte paper,  then mounted the photo onto mat board and let him write beneath it 
(in his very best and most careful first grade handwriting)
Great Teachers Help Children Bloom 
Love, Tate
Last time I was in her room she still had it up!

Optional IDEAS
~You could frame it as well but I just left it on the mat board. 
~You could let your child paint or draw a flower and use the same saying.
~You could let your child take a photograph of anything just let them add their handwriting to it to make it feel like it is genuinely from a child.


Wednesday, April 7, 2010

Simple Denim Aprons~Teacher Appreciation or Mother's Day Gifts!

I decided that this is going to be a Denim week so I thought I would continue on with some more
Jean Ideas.

If you have some jeans that wont fit (even with the Instant Button, dont forget to enter the GIVEAWAY!), here is something fun to try!
  
My Grandma gave us these adorable matching Aprons for Christmas. 
I was thinking this would be fun to make for my son's teacher for Teacher Appreciation Week that is coming up in May.
I also think this would be a very cute gift for Mother's Day for my mom. She is always crafting with my daughter. It would be fun to make them matching ones to keep at her house.

Here is the front and back view.  Isnt it cute?

I havent made one myself so I took some photos of ours to show how she did it:

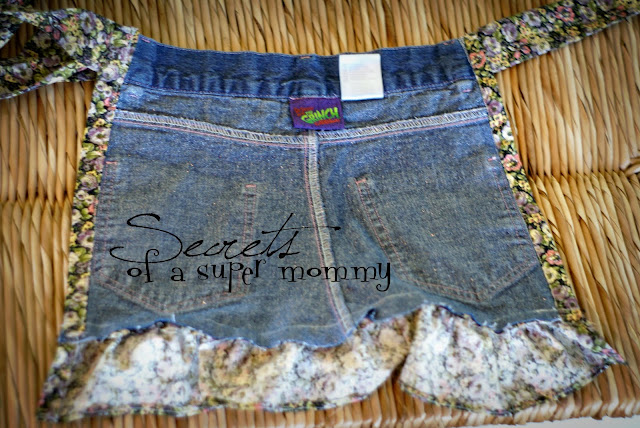
This is the inside of the Apron.  You cut the behind part of the jeans off to use as the font of your apron, leaving the back two pockets intact to use for towels, utensils, etc.

Then cut a 3-4 inch piece of fabric to the length you will need for your edges (Dont forget to leave 8-10 inches extra if you are ruffling it!) and hem one edge under.  My Grandma used a Zig-Zag stitch and I think it is really cute.

Then sew fabric onto the edges in a ruffle or straight seam.  Mine is ruffled and the little one is straight.  For the ruffle I would just put the right sides together and sew in a zig zag tucking here and there for the ruffle effect.  If you are more of a seamstress you could adjust the tension very loose and make the ruffle on your machine, then sew it on.  For the straight seam, the fabric looks like she just folded it over the denim and sewed it on with a straight stitch.  Easy, easy...haha, but we should never say that in sewing!
Then you have to sew on some fabric to tie it on with. Ours are only long enough to tie in a knot, not a bow.  It is about 16-18 inches from the denim on each side.  To make the tie just cut a strip of fabric about 4 inches wide.  The fold it in half the long way and sew it together with the wrong side out.  Leave one end open.  Then turn it right side out and you are ready to sew it on.  It is sewn onto the top section of the denim.  The top of the ruffle is folded over and then zig-zagged onto the tie (shown right).
If you have any questions leave me a comment!  I am a guesser at sewing so my instructions may not be all that clear!!

If you make one and blog about it send me your link, I would love to see how they turn out!
Happy Crafting to You!
Related Posts with Thumbnails